Backbone.ModalDialog.js v0.3
Recently at work I gave my Backbone.js modal dialog a good run out on a fairly complex edit profile screen. Each distinct element of a user’s profile is editable separately in a modal dialog. I made a few changes along the way so now here’s the 0.3 release.
The changes in v0.3 are :
- Added option showModalAtScrollPosition (default true) to determine whether the modal dialog is displayed so it is visible in a scrolled viewport (a sensible default), or is displayed at the top of the document where it might be invisible if the window has been scrolled down.
- Fixed a problem where the opaque blanket div didn’t cover the entire screen when the window was scrolled. The modal blanket div’s height is recalculated every time a dialog is displayed (in case the window height has changed since last time).
- Added the recentre() function which you can call to recentre a modal dialog in case the content has changed. Useful if errors messages have been added for example. Americans can use recenter().
- Improved how the positioning works.
- The showModal() function now returns this.
- Added validation to the demo using Thomas Pederson’s excellent backbone.validation.js.
See the demo page live in action.
Backbone.ModalDialog.js v0.2
I’ve made a few changes to my Backbone.js modal dialog plugin. I’m using it in my own web app and I needed to make some changes and hopefully others will need them too.
Here’s a quick demo :
The new features are :
- Added option to render the modal dialog into a given container element allowing relative absolute positioning.
- Added option to slide the modal dialog down from above or up from below.
- You can now provide an css properties to be applied to the modal dialog.
- Clicking on a jQuery ui calender control no longer causes the modal dialog to close.
- Improved the default position of the modal dialog to be more central.
Happy modalizing.
PS: The YouTube video quality is quite poor isn’t it, looks ok outside of YouTube. What’s wrong with it? Can anyone recommend a YouTube compatible screen capture app?
Backbone.js collections can listen to their models’ changes
I wanted to know if Backbone.js collections can listen to their models’ events. It turns out they can. In your collection you just need to use the same binding mechanism that you would in a view.
	initialize:
  function() {
    this.on("change:name", this.changeName);
    this.on("change:age", this.changeAge);
  },
Here’s a JSFiddle test :
I looked in the Backbone.js source code and found where it happens :
	// Internal method called every time a model in the set fires an event.
// Sets need to update their indexes when models change ids. All other
// events simply proxy through. "add" and "remove" events that originate
// in other collections are ignored.
_onModelEvent : function(ev, model, collection, options) {
    if ((ev == 'add' || ev == 'remove') && collection != this) return;
    if (ev == 'destroy') {
        this._remove(model, options);
    }
    if (model && ev === 'change:' + model.idAttribute) {
        delete this._byId[model.previous(model.idAttribute)];
        this._byId[model.id] = model;
    }
    this.trigger.apply(this, arguments);
}
Using jQuery to display a form validation error
I’m obsessed with best practice form design and usability. There are lots of guidelines about validation messages.
I’ve decided on a way of displaying validation errors and success messages on forms for my current project. I’ve turned this into a jQuery form error plugin on GitHub which provides some quick wins :
- A single function call to display a validation message next to a field.
- A single function call to remove a validation message and optionally displays a success image in its place.
- No additional css is required.
In the GitHub project you’ll find the Index.html which demonstrates a simple form with some validation. Here’s a video of the plugin in action :
How do I use jquery.formError?
First of all you need to know when a form control has invalid data because it’s then that you want to call the plugin. I’ve kept the validation logic in the demo simple so the focus is on the plugin. If you’re using Backbone.js I can recommend the excellent backbone.validation plugin as it has the required valid/invalid callbacks you’ll need.
First you’ll need to include the jQuery.formError.js plugin javascript file. Then, to display a validation error message on an input with an id of “name” :
	$("#name").formError(
	"Name cannot be greater than 15 characters long");
To remove the validation message when you have successfully revalidated the value :
$("#name").formError( {remove:true});
By default removing the validation message will place a validation success image in place of the error. So you’ll need an icon for this like the one in the demo. To disable this behaviour :
	$("#name").formError({
   remove:true,
   successImage: {enabled:false}
});
The default image url is just “success.gif” which you can easily modify on a per-call basis :
	$("#name").formError({
   remove:true,
   successImage: {src:"img/success.gif"}
});
The plugin also gives an invalid control the css class invalid. I leave it up to you to decide the visual effect .invalid has on the control. In the demo.css file you’ll see that it applies a red border. This css class is removed when you remove the error message.
Why not put the validation message underneath the control?
It’s common for web forms to put their validation messages directly underneath the invalid control. Like this :
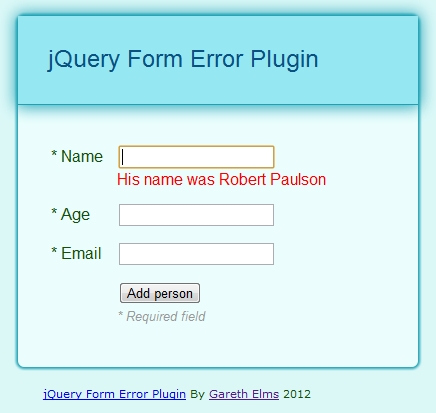
I’ve had two problems with this approach :
- The insertion of the message makes the whole form increase in size. This is a visually jarring experience for the user but there is another problem with this.
- If you type in some invalid data and then press the submit button the first even to fire is the control’s change event. If the user has just corrected some data (a common pattern just prior to pressing the submit button) a validation message may be removed from underneath the control thanks to the control’s change handler. The whole form then shrinks a little and the mouse click, whose event fires next, is no longer on the submit button. The button has moved! So you have to click it again. This is an annoying and confusing user experience.
Finally
I did start with the qTip jQuery plugin for these messages but I wanted something simpler whose HTML I could control.
Creating A Modal Dialog In A Backbone.js Kind Of Way
I’m finally using Backbone.js. It’s brilliant and I can’t recommend it enough. Backbone is not trivial but it solves a difficult problem.
So I needed a modal dialog. I messed about with a couple of modal dialog plugins but had problems getting them to work in a way that fits in with Backbone.js. After finding out how easy it is to create your own modal dialogs I decided to create a new Backbone.js view from which other views can derive and inherit modal functionality.
You can download a demo of my Backbone modal view from my Github page which looks like this :
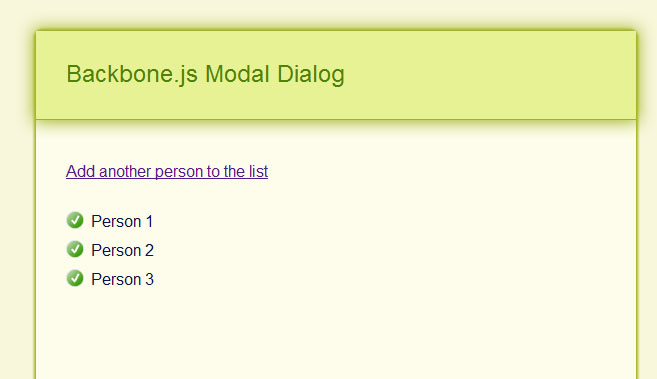
The demo doubles as a basic demonstration of Backbone.js and of my modal view. When you click “Add another person to the list” a Backbone view is created which derives from ModalView. This gives the child Backbone view a showModal() method. You just render your view as normal and then call showModal(). For example here is the click handler for the add person button :
	$("#addPersonButton").click(
   function( event) {
      // Create the modal view
      var view = new AddPersonView();
      view.render().showModal({
         x: event.pageX,
         y: event.pageY
      });
   });
The AddPersonView class extends my ModalView class like this :
	AddPersonView = ModalView.extend({
    name: "AddPersonView",
    model: PersonModel,
    templateHtml:
        "<form>" +
 "<label for="personName">Person's name</label>" +
 "<input id="personName" type="text" />" +
 "<input id="addPersonButton" type="submit" value="Add person" />" +
 "</form>",
    initialize:function() {
      _.bindAll( this, "render");
      this.template = _.template( this.templateHtml);
   },
    events: {
      "submit form": "addPerson"
   },
    addPerson: function() {
      this.hideModal();
      _people.add( new PersonModel({name: $("#personName").val()}));
   },
    render: function() {
		$(this.el).html( this.template());
		return this;
	}
});
Because AddPersonView extends ModalView you can call showModal() on your view and this happens :
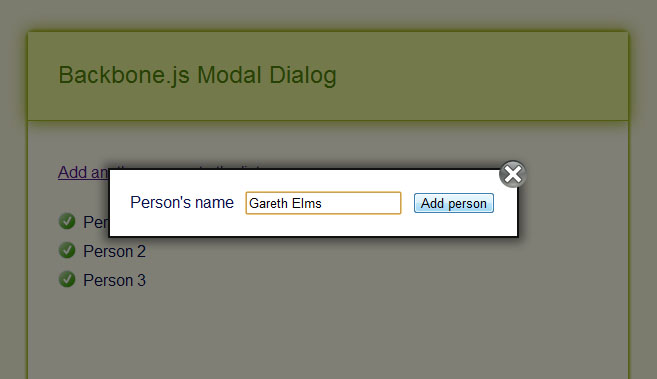
What you’re seeing is the el property of the AddPersonView instance being rendered into a modal container which gives you a few things for free :
- You can close the dialog by either pressing escape, clicking outside of the dialog or pressing the close icon
- The background is shaded back to highlight the modal view
- The focus is automatically set on the first form control in the modal view
- The modal dialog is, by default, positioned in the centre of the screen
In this example I’m positioning the dialog at the mouse cursor coordinates at the point when you click the “Add another person to the list” button. You can pass an options object to showModal() which gives you a bit of control of the internals of the modal dialog code. Here are the defaults that you can override :
	defaultOptions: {
	fadeInDuration:150,
	fadeOutDuration:150,
	showCloseButton:true,
	bodyOverflowHidden:false,
	closeImageUrl: "close-modal.png",
	closeImageHoverUrl: "close-modal-hover.png",
}
And as you have seen you can also pass in x and y properties. Hopefully these options are self explanatory except perhaps bodyOverflowHidden which helps the dialog stay on screen. The new Twitter add new tweet dialog does something like this too.
The demo includes two images that represent the close button and its hover state (it goes red when you hover over it). You can override the images easily through the showModal() parameter.
Back to the demo
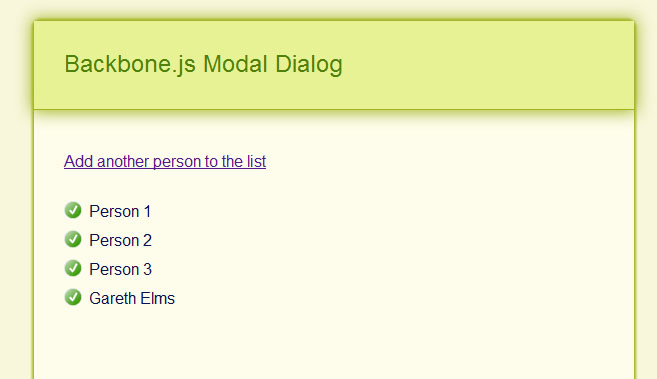
If you type a name in and press the Add person button then a person model is added to the person collection. Because this is Backbone.js this automatically triggers the rendering of a new PersonItemView into the PersonListView :
I’m Happy
I’m happy I stepped back and learned javascript properly and got into Backbone.js. I find that being self critical and determined makes you a better developer. Backbone.js forces you to break your UI down into small units and collections of units, each with their own set of event handlers. And it forces you to do this before you start creating your UI. This is crucial because it enforces design and forethought, the absence of which normally leads to big balls of code mud.
To learn Backbone.js I found the following resources useful :
- Joey Beninghove’s Backbone.js Quickly screencast
- PeepCodes Backbone.js Basics and Backbone.js Interactivity screencasts
- Tekpub’s Backbone.js APS.NET MVC 3 screencast
- Chris Strom’s stream of Backbone.js consciousness
- Nik Gauthier and Chris Strom’s Recipes With Backbone book
- The top quality Backbone.js documentation
- Rob Conery’s blog posts where he refactored the ToDo list demo
Finally I know that modal dialogs are known to be not in the best interests of usability but there is a subtle difference between true I-want-to-take-over-your-app-and-secretly-own-the-whole-world modal dialogs and these soft easily-closed dialogs. Facebook uses soft dialogs, as does Twitter. Use inline editing where it makes sense and a separate page where a modal dialog is being asked to do too much.
Download the code and demo from github or see the demo page live in action
Update: v0.3 is complete adding a few new features I needed.
Javascript Sandbox for ASP.NET MVC 3
I’ve started reading more about Javascript this year. My home project is coming up to the point where I’m making some important client side decisions and I want to make sure I’m making the best choices.
As anyone who has looked beyond the surface will tell you, Javascript is deceptively complex and capable. I have four books helping me out at the moment :
- Javascript Web Applications by Alex MacCaw
- Javascript Enlightenment by Cody Lindley
- Javascript : The Good Parts by Douglas Crockford
- Javascript Patterns by Stoyan Stefanov
I recommend all four. I started reading Javascript Web Applications by Alex MacCaw because I wanted to understand how Javascript frameworks like KnockoutJS, BackboneJS and JavascriptMVC are constructed rather than just use them and this book is exactly for that purpose. For me it quickly proved to be a bit too “in at the deep end” so I’ve switched to Javascript Enlightenment by Cody Lindley to get a solid and deep understanding of Javascript.
All these books have code examples and I learn best by following, experimenting and pushing the samples with questions that pop up. So how does an ASP.NET MVC developer play around with Javacsript?
- You could have a folder full of HTML files and chuck your javascript in there, and run them individually
- You could use JS Fiddle
- You could spend three hours creating a modest little sandbox framework built as an ASP.NET MVC app
I did the last one. At one point I abandoned it and switched to JS Fiddle, but then I went back to it. I prefer messing about in my own environment sometimes.
I’ll call your individual Javascript fiddles a sandcastle because I’m looking left and right and can’t see anyone telling me not to (although I am alone in my upstairs office). A Javascript sandcastle is created as a view like this :
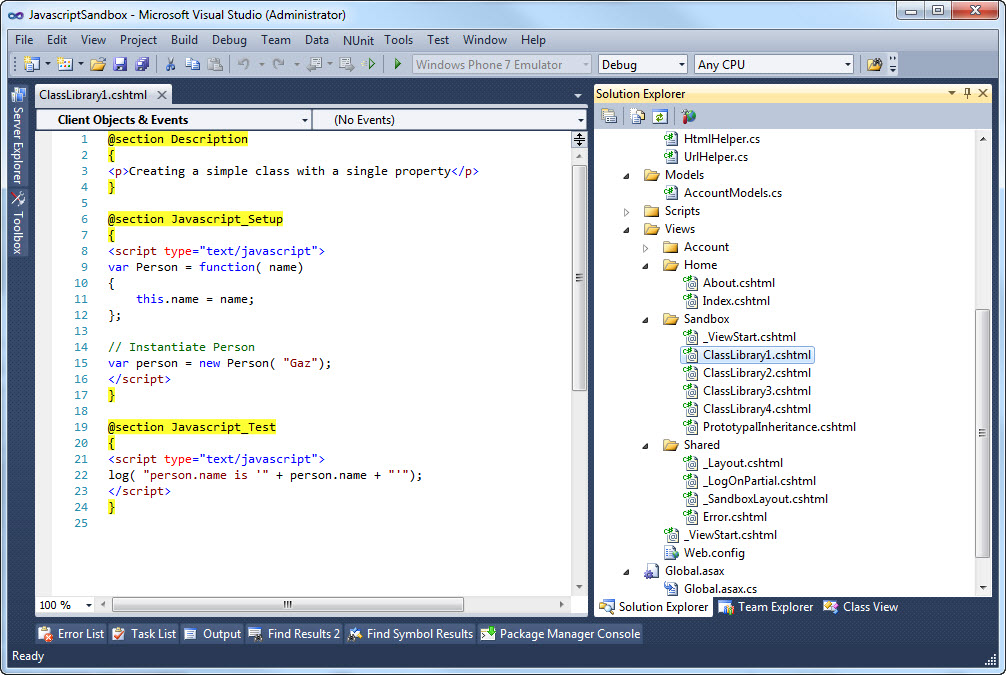
- Description : Optional description of what your javascript is testing
- Javascript_Setup : Stick your setup code in here
- Javascript_Test : The code that runs against the Javascript_Setup code
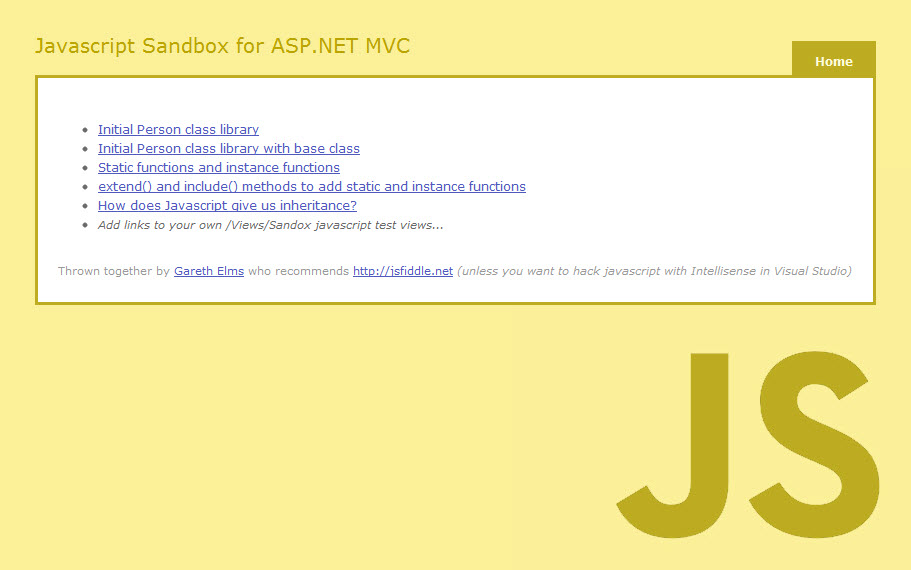
Then edit the Home/Index view to add a link to your new test. As you can see from the screenshot in the link I’ve added the html helper @Html.SandboxLink(sandboxViewName,description) to simplify generating links to your Javascript tests. I want to automate this at some point in the future so you only need to create the views.
The advantage you will notice at this point is that you get Intellisense in your sandcastle because it’s all in an ASP.NET MVC view in Visual Studio. The other advantage comes from how the _SandboxLayout.cshtml page presents the results. Here’s what you see when you’ve run a test :
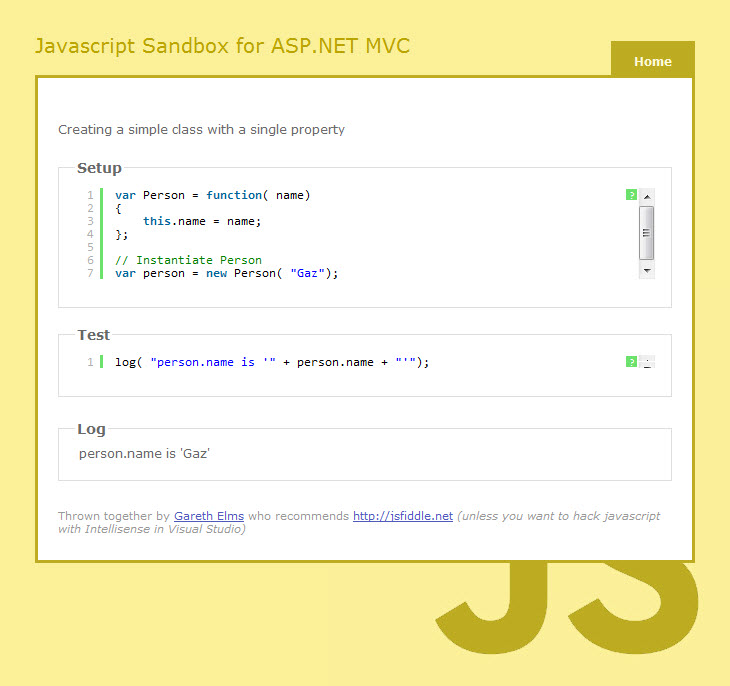
Your sandcastle is presented nicely and formatted using the terrific Syntax Highlighter by Alex Gorbatchev. There is a generous 500ms pause while I wait for the formatting to complete then I run your test code. In your JavaScript you can call the helper log() function which outputs to the Log area at the bottom thus completing your test and showing you what happened. Logging helps to see the flow of the code which isn’t always obvious with Javascript, look at a slightly more complex example to see what I mean.
When I’ve grokked the good parts of Javscript the next step on my client side journey is Javascript unit testing. When I mention “test” in this blog post I’m not talking about unit testing an application’s code, I’m talking about isolated tests that’ll help you figure out some code – a tiny bit like how we use LinqPad (but that’s in a different league of course).
You can download this project from my Javascript Sandbox For ASP.NET MVC 3 Github page (I’m really enjoying using it to learn Javascript) or you could use JSFiddle and wonder with bemusement why I spent 3 hours putting this project together, 2 hours writing this blog post and 15 minutes messing about with Git when I could have finished the book by now and be back working on my home project.
My home project is such a long way off because every little step of the way I’m going down all these rabbit holes and discovering that rabbit droppings taste good.
